DMD795x2
A simple game engine for a 8x8 dot matrix display using only 2 x 74HC795 driven by an arduino uno
The library is available as a .zip library file with examples to be added to your arduino IDE at: Library Repository
What is this?
- A simple C based game engine for arduino & dot matrix display
- A platform for you to build an arduino based retro game or applications (3 different examples supplied)
- A simple "no hidden magic" game engine for educational purposes
What do you need?
- Arduino (UNO is used, but any arduino will do)
- 2 x 74HC795 shift registers
- 1 8x8 dot matrix display ( 16 pinned monocolor type is used)
- 8 resistors appropriate to limit current to the dot matrix display you are using ( usually 220 - 470 Ohm will do)
- hookup wires & breadboard
[ Some of the examples use a buzzer for game sound and a thumb-joystick or buttons will be needed for game control ]
Basic Wiring:
If you wired everything correctly you can run Simple_one_by_one_led or Marquee examples included.
Refer to https://github.com/otuk/DMD795x2/blob/master/DMD795x2_basic_wiring.png for basic wiring.
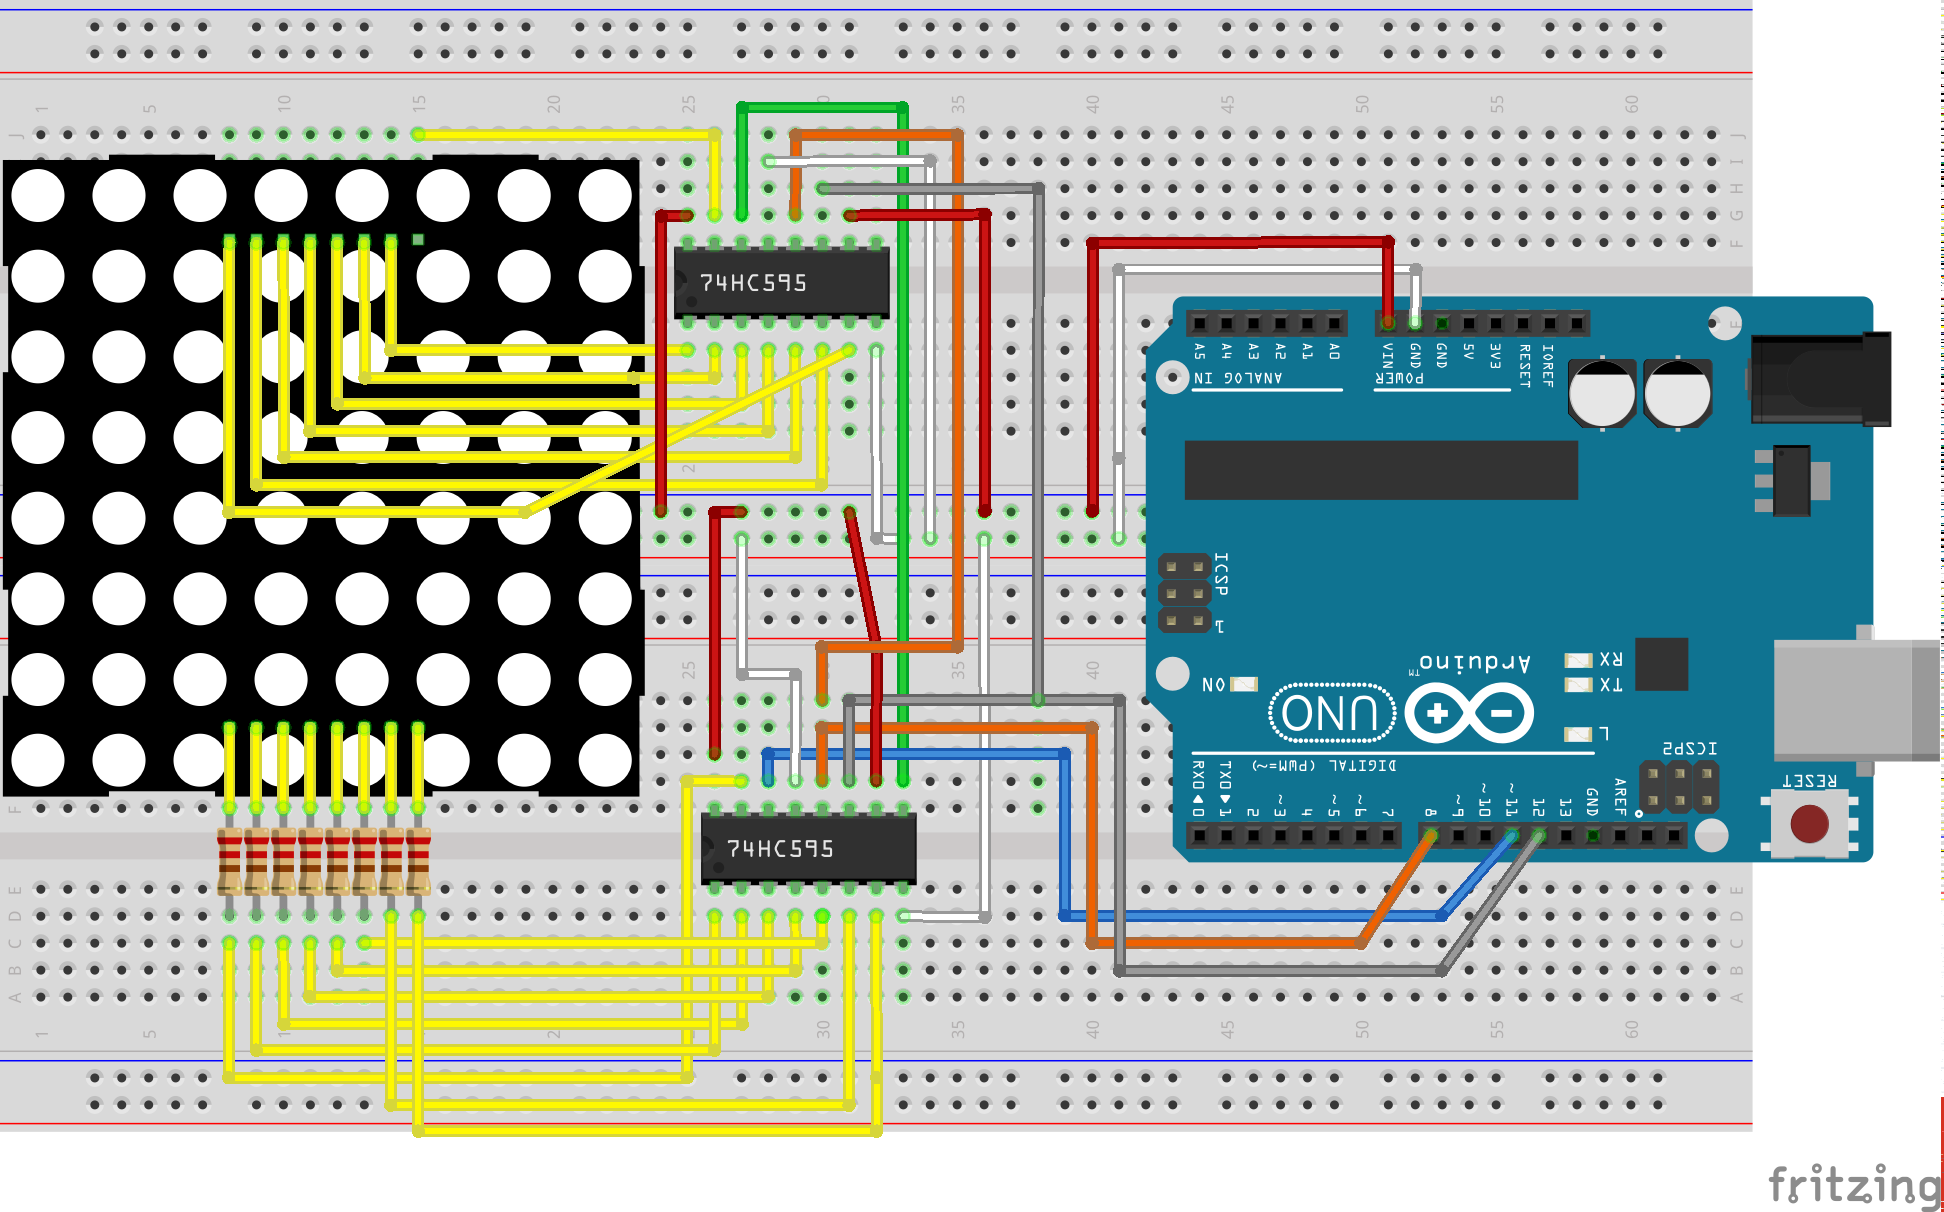
yellow wires: parallel data lines
blue wire: serial data line to first 74HC595
green wire: serail data link from first to second 74HC595
gray wire: serial clock
orange wire: latch/register-clock wire
red wire: 5V
white wire: GRD
How does it work?
The DMD795x2 library is a simple 2 file library.
In your game/application's setup() function you setup which 3 pins of arduino you will use to communicate with the 74HC595 shift-registers.
For example; DMD_setup_ctl_pins(8, 12, 11);
That means:
Arduino (latchPin) pin 8 will be wired to RCLK pin (pin#12) on 74HC595
Arduino (clockPin) pin 12 => SRCLK-serial clock of 595 (pin#11) on 74HC595
Arduino (dataPin) pin 11 => SER -serial input pin of 595 (pin#14) on 74HC595
And in a typical game loop, you are expected to update your game sprites/objects data including how they shd be drawn on display. After that you call the DMD_render_matrix() function to render display, and control frames per second with DMD_fps(int) function.
Your typical arduino application/game will have a loop() function such as the following
update_the_game(); <= you implement this application/game specific method
DMD_render_matrix(); <= you just call this to display the latest state of game data
DMD_fps(30); <= you can play with FramesPerSecond rate to adjust for best view
Important functions
a. unsigned short one_led DMD_getpins(i,j) => gives you a unsigned short , that is the data to turn ON one led at row i and column j this is data ready to be added to the display data for that frame
b. void DMD_render_matrix knows how to display these.
c. void DMD_reset_display_data() => Simply tells DMD_render_matrix to remove/reset any existing display data
d. void DMD_add_display_data( &one_led, 1 ) => each game object usually will have more than one led to be turned ON for its display so you pass an array and/or you can add to the current display data before the DMD_render_matrix call for that frame. First argument is a pointer to the value received from getpins call and second is the length of
The library and example files have plenty of comments that will help you to code your application in no time for your Retro Fun.
Enjoy!